


How To: Bladder Replacement for Wessels Expansion Tanks
Changing an expansion tank removable bladder is easy. Let’s go through it step by step.
Begin by isolating the expansion tank from the system. Remove valve cap and unscrew the valve core to release the air charge and then carefully lay the tank on its side to drain water out.
Next, remove the elbow connector at the base of the tank and remove jam nut. Push the bottom system connection into the tank. Remove the top cover from the tank and pull the bladder out. Be sure to save the jam nut and system connection as they are not a part of the bladder replacement package.
Clean the bottom system connection. Then inspect the bladder to make sure there are no sharp edges from the connection that can cut you or the bladder.
Inspect the inside of the tank for moisture, debris, or sharp edges. Any sharp edges should be ground smooth or touched up with sand paper. This will prevent the new bladder from rupturing by rubbing up against them.
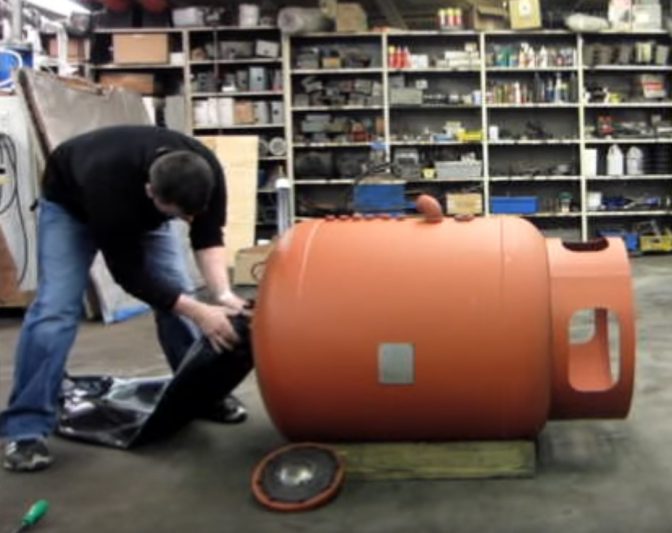
Remove the new bladder from the box and inspect it for tears or holes before installing it into the tank. Drop the bottom system connection into the bladder and insert into the bottom opening.
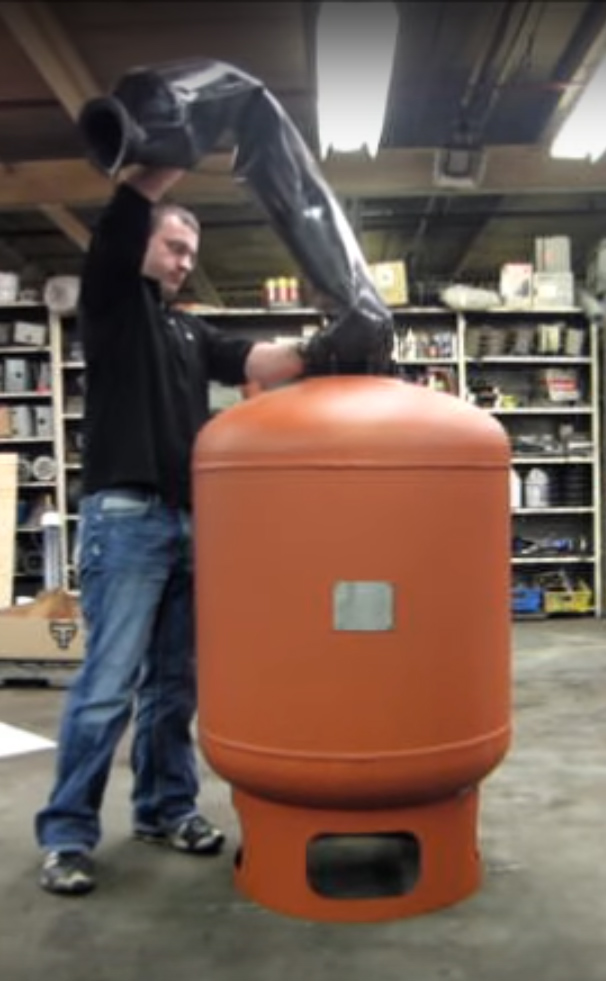
Carefully set the tank upright. Lay out the new bladder and roll it vertically to allow the entire bladder to fit into to hole in the top of the tank and guide the bladder inside.
Pull the bottom system connection through and screw the jam nut on the bottom. Return the tank to its side to allow for easier installation of the bladder. Tighten the jam nut with a pipe wrench to a hand tightened strength plus ¾ of another turn.
Wrap the bottom system connector with Teflon tape, apply pipe sealant and attach the elbow connector to the bottom system connector. Before putting the top cover back on, make sure the bladder is seated inside the tank properly and is not twisted.
Re-attach the top cover evenly, tightening bolts in a star pattern. If using an impact gun to tighten, use 50 – 60 lbs. of pressure on your settings. Stand the tank back up, secure the valve core, and pre-charge tank to minimum system pressure.
Your new bladder is now installed, and the expansion tank is ready to be introduced back into the system. Make sure you check the pressure 24 hours after installation to ensure pressure is holding. After that, check the pressure every 6 – 12 months. Under normal application, the unit should not lose more than 1 lb. per year at most.
If you have any questions about the bladder, tank, or installation, please call the Wessels Company office at 317-888-9800.
Wessels also has a handy youtube video which breaks down the process in easy to follow steps:

November Employee Spotlight
Tim Peiffer is Wessels Company’s Vice President of Operations and has been part of the Wessels family for over 10 years. Tim has been the VP of Operations nearly 3 ½ years. He likes getting together with friends and watching his favorite local band perform. He also likes to exercise and watch Ohio State during football season. Tim says he’s a handyman and can generally fix or repair nearly anything. An interesting fact about him is that he and his wife built their own house with help from family and friends.
Tim fast facts: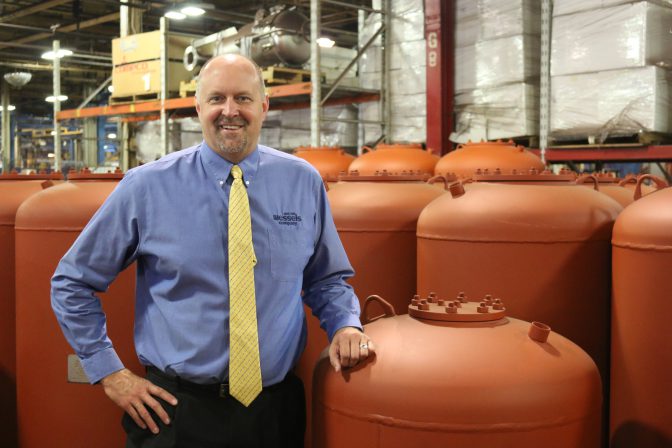
Nickname: Timmy
Favorite color: Blue
Favorite food: Lasagna
Likes: Wessels Company, hanging out with friends
Hobbies: exercising, rooting for Ohio State and Cleveland sports teams

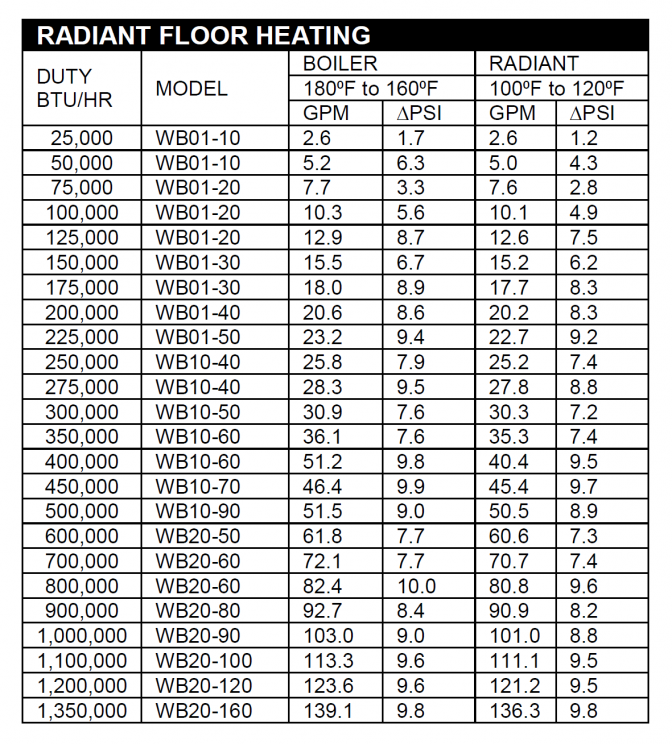
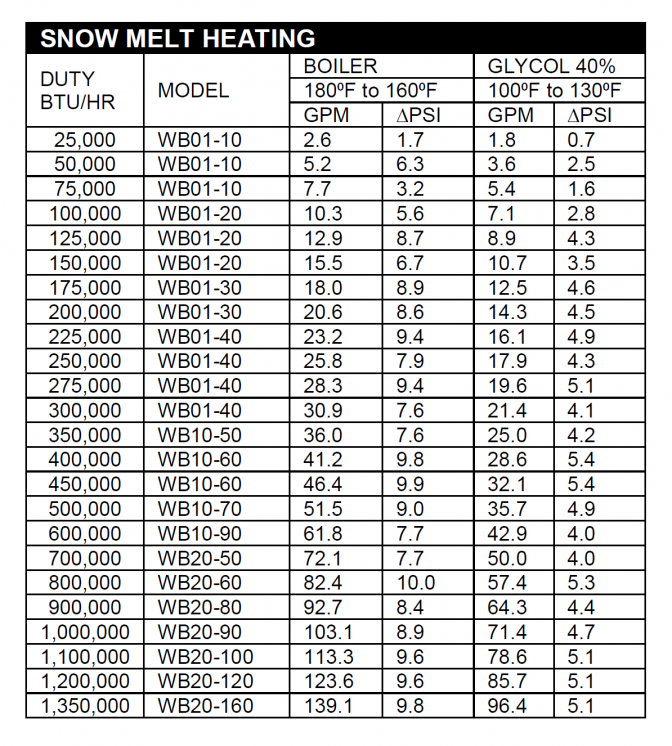
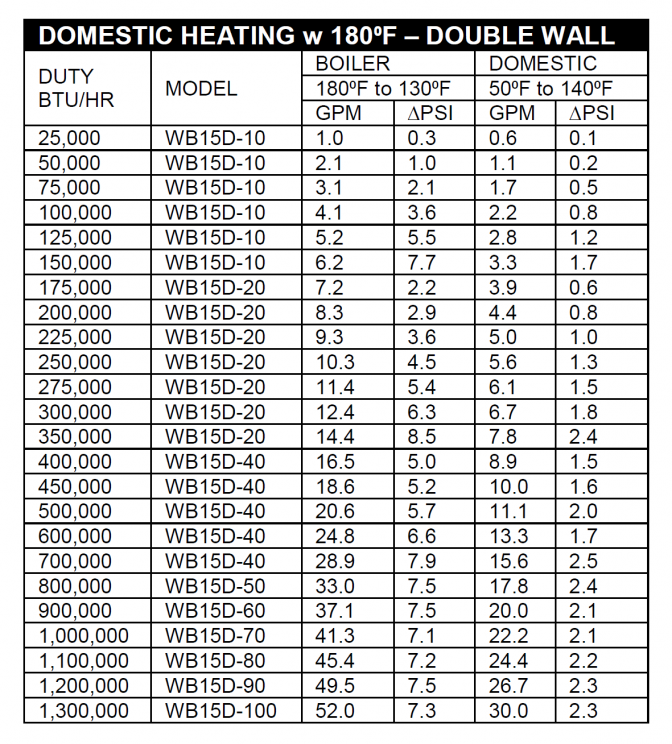
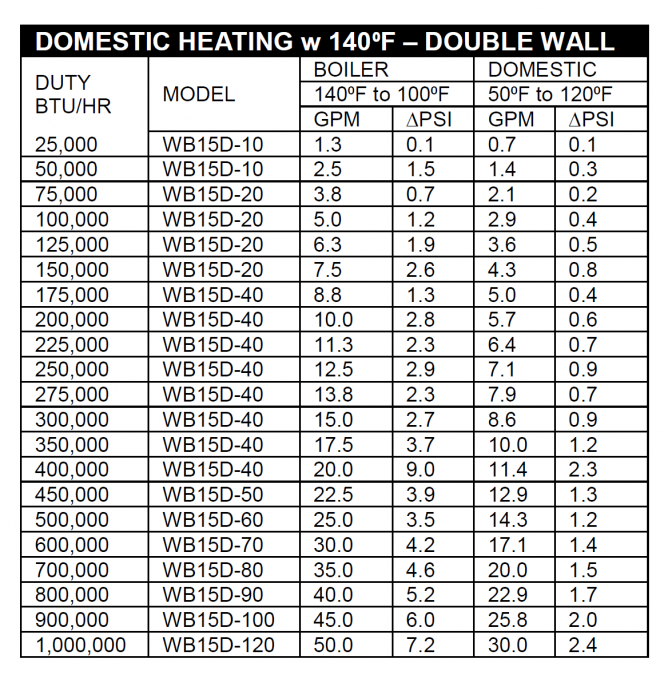
How To: Size Brazed Plate Heat Exchangers
WesPac® Brazed Plate Heat Exchangers feature specially constructed heat transfer plates that are bonded together with brazing material to produce an incredibly strong, compact vessel. Rather than using an adjustable design with replaceable plates like the WesPlate®, these brazed plate heat exchangers cannot be modified, so correctly sizing a unit is very important.
Fortunately, Wessels has produced a few easy-to-use charts for sizing WesPac® brazed plate heat exchangers based on use-case scenarios like radiant floor heating, snow melt, and domestic heating.

September Employee Spotlight
Patrick Endris has been a part of the Wessels Company family for over 18 years and is currently our Production Manager. Patrick attended Purdue University in Lafayette, Indiana. He enjoys hiking, being in nature and being near the ocean. He dislikes rude people and drama. In his personal time Patrick spends time with and takes care of his family.

Patrick’s fast facts:
Favorite color: Green
Favorite food: Italian
Likes: nature and the ocean
Hobbies: hiking and walking

How To: Size Well Water and Pressure Booster Tanks
 The correct size for most well water and pressure booster tanks (also called hydropneumatics tanks) can be calculated by simply answering two questions: how much water do you need to store and what is the range of the pressures allowable for the water (minimum and maximum pressures)? The amount of water stored in a vessel between high and low pressures is commonly called “drawdown” and the high and low pressures are dictated by the size of the tank’s air cushion.
The calculation to determine stored water requirement (drawdown) is:
Drawdown (gal.) = pump run time (min.) * pump capacity (gpm)
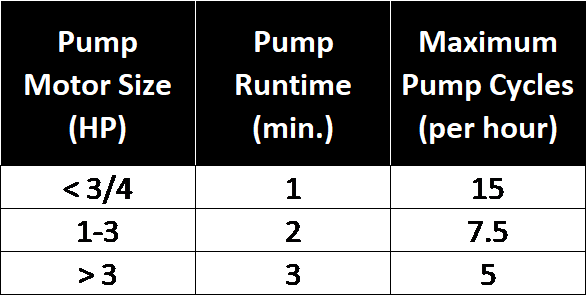
Pump capacity is the maximum fluid flow-rate through a pump as determined by your pump’s design. A system designer often uses an accepted rule-of-thumb based on the pump motor size: the larger the motor, the more energy (heat) exerted during initial pump startup. Motor manufacturers have suggested the following:
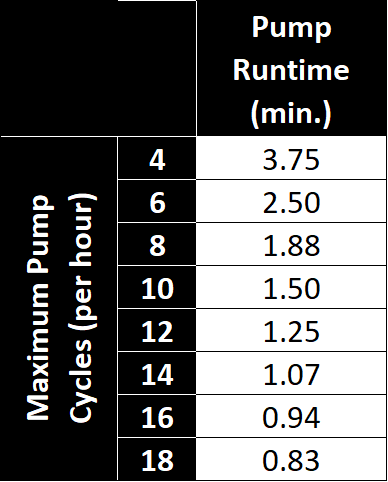
Sometimes, a design engineer will state a maximum number of pump starts per hour and then divide 60 minutes by the number of allowable cycles per hour to get the pump run time. However, this false assumption will result in a tank that is excessively oversized. The following chart reveals the pump capacity multiplier needed based on the maximum number of allowable hourly pump cycles.
After you’ve calculated your drawdown based on your pump run time and pump capacity, you can use that number to determine the total gallons your tank will need to hold. The equation is:
Drawdown (gal.) ÷ acceptance factor = total gallons
Once you’ve determined your tank’s total gallon requirement, simply cross-reference that number with a list of hydropneumatic tank volumes to determine the right tank for your application!
Click to View Hydropneumatic Tank Submittal Data
Please note: the preceding sizing is based on constant flow pumping systems where the function of the tank size directly relates to pump motor protection. Sometimes, there are systems with variable frequency drive (VFD) pump motors or tanks used to store water to aid the pump’s capacity or provide deliverable storage during an electrical brown out. These systems and their associated sizing will be discussed in future installments.

Employee Spotlight for August 2018
August Employee Spotlight!
One of the smiling faces at Wessels is Barb Hult. Barb has been the Accounts Payable Manager for 4 years but has been part of the Wessels family for more than 6 years. She enjoys the outdoors, reading, positivity and laughing. Her hobbies include reading and traveling and during football season, she enjoys rooting for the Indianapolis Colts.
Barb fast facts:
Favorite color: Blue
Favorite food: seafood
Likes: dogs, outdoors, reading, honesty
Hobbies: reading, traveling

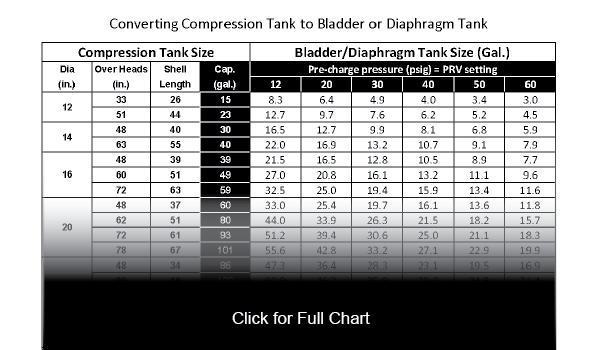
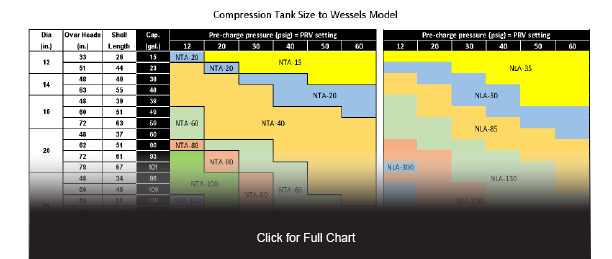
How To: Convert Steel Compression to Bladder Diaphragm Tanks
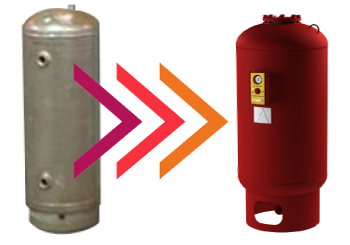
There are many reasons to upgrade from a plain steel compression tank to a newer bladder diaphragm tank. The main benefit is to reduce maintenance in a typical HVAC system. Compression tanks are prone to waterlogging, which causes loss of pressure control in the system. Unlike a compression tank, bladder diaphragm tanks separate the air from the water, so they cannot become waterlogged. Bladder tanks are also space-saving because they are typically smaller in size.
Wessels often fields questions about how to convert compression to bladder tanks, so we’ve developed several easy tools. Our free tank sizing software can do the work for you. However, for a deeper understanding of the math involved, we recommend following along below to find the formula and charts that will help you determine what size and kind of bladder diaphragm tank is the best replacement for you.
The basic formula simplifies to this:
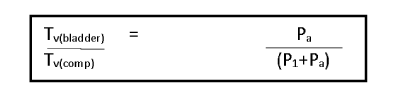
Now let’s see how we get there and what it means.
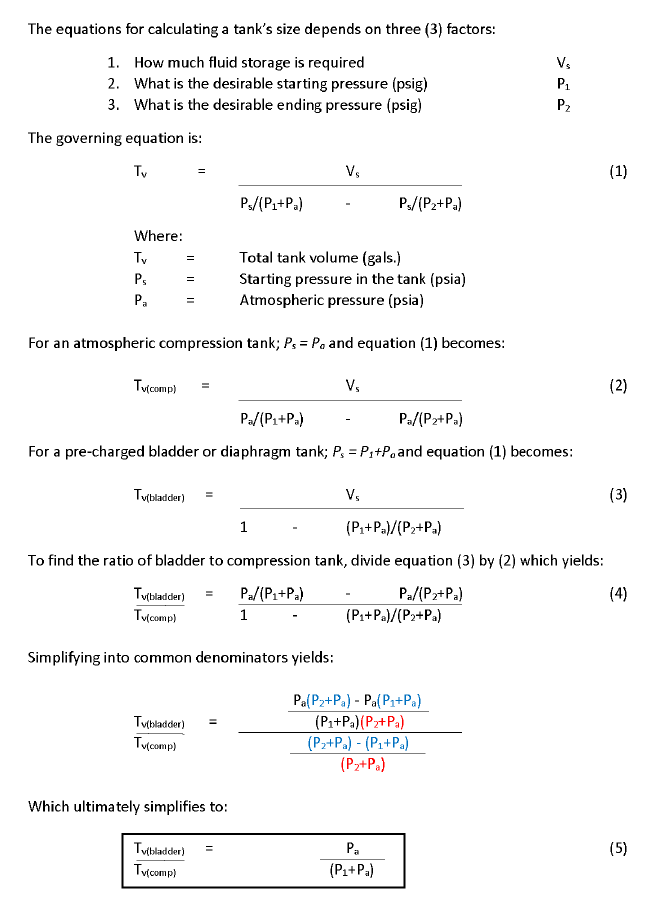
Installing a new bladder diaphragm tank can improve the overall function of your HVAC system and greatly reduce maintenance. The conversion formula and charts below will help ensure you get the most out of your system.
Want to skip the math? Simply click the “Size Your Tank Now” button on our website, or download the app to your phone, and use the free compression conversion tool now:

 Download from the iOS App Store
Download from the Android Marketplace
Still have questions? Be sure to check out our FAQ or contact us directly via Live Chat or by calling our offices at 317-888-9800